We have finally booked our train tickets back down to Spain for late March, and so our GR1 hike takes a big step closer to reality. This also means that we have a strict deadline to work towards and looking at the mess of equipment, books, maps and re-supply boxes piled up everywhere, that is a bit daunting. From now until departure our prep will centre on a few key areas namely; gear preparation, logistics (food re-supply/transport), navigation (maps downloads/guidebooks) and training. Today this blog will focus on our gear choices as this aspect is nearly settled. Our updated gear list can be found here: Gear List
Choosing the right gear for long distance hiking is an art form, everything we take has to be researched and scrutinized to earn its place in our bags and therefore on our backs. There is a huge amount of information out there on lightweight hiking and this has been very inspirational as we have evolved our set-up. When we did the Norfolk Coastal Path in 2014 our base-weight was a monstrous 16kg (= weight without water, food, fuel), so in total about 18/19kg. The strain this caused was terrible and took so much pleasure out of the hiking. Since then we have come a long way and dropped to a 10kg baseweight for the GR11 in 2015. This year we hope to shave a bit more off that and are aiming for a 9kg baseweight which officially puts us into the ‘lightweight category’! Assuming we carry (an average) additional 5kg for combined food/water and fuel, this puts our total weight at a respectable 14kg at any given time.
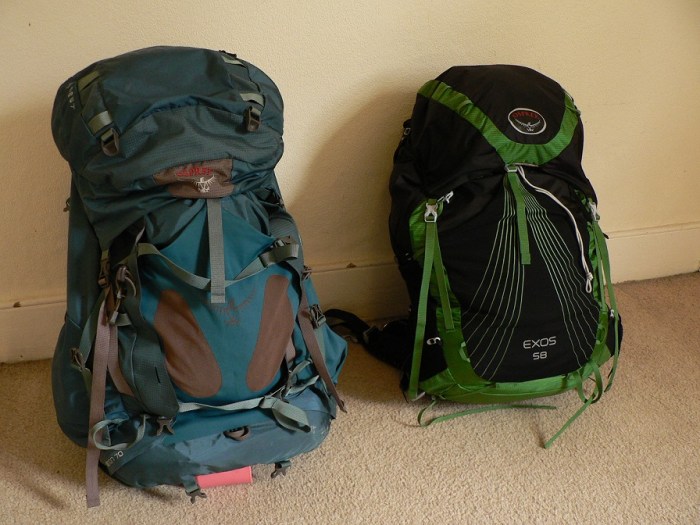
In 2015, we swapped rucksacks from the Osprey Xenon 70L (left) to the Osprey Exos 58L. The Xenon is a superb quality bag, but at 3.5kg, very heavy. At 1.09kg the Exos does a great job and cuts nearly 2.5kg of pointless weight.
The gear we take is viewed as a system rather than individual bits; it’s a balancing act that demands everything ‘works together’. I see this balancing as 3 points on a triangle where each item is weighed against function, weight and cost. Striking the right balance between all points is difficult; specialist lightweight gear can tick the weight and function boxes for example, but nearly always comes at a higher cost. Ultimately we need to know our own needs and priorities for a given hike.

Our decision-making triangle for gear choices- each piece sits somewhere within it.
Not wanting to spend out and replace perfectly good gear, we are learning where to compromise and where to invest. We have invested in more technical or critical items such as our tent, rucksacks, socks and sleeping bags, but don’t bother to spend out on branded t-shirts, base-layers and fleeces for example.
However, we have learnt that we can’t put a price on walking light and strain-free, so we are cautious of false economies in gear purchases. Our mantra now is to buy the lightest functional item we can afford because it will pay-off for us in our enjoyment and comfort. Note my mention of ‘lightest functional‘ items: we would never compromise our safety, the item always has to perform the function that we need it to do. Because of its link to safety, ‘function/quality’, sits at the top of our decision triangle above.
Finally, when selecting and refining gear, there is no substitute for experience. Post GR11 we are more aware of our needs and limits, what we value and what we are confident to do without. What follows is the ‘gear solution’ which meets our needs for the GR1 (a low-medium altitude spring hike), but it will continue to evolve as our progress towards ever lighter hiking continues.
So, getting down to business, this is what the contents of each of our packs looks like:
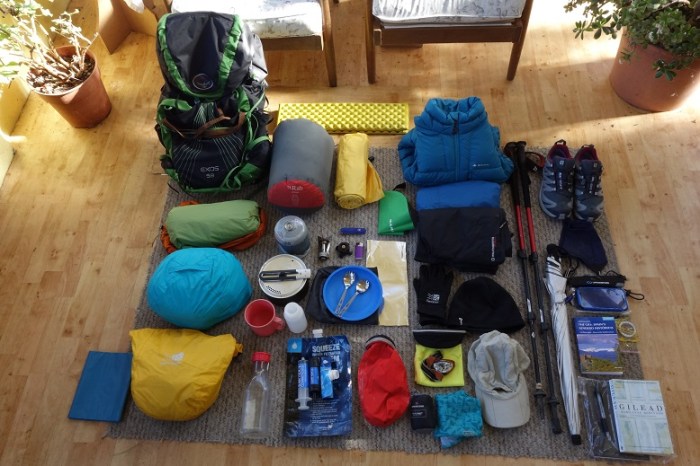
Above: This is what I’ll be carrying, minus water (food bag is yellow).

And this is all Barry’s stuff, his food bag is green (kettle and pink cup now replaced by a titanium mug, see below).
There’s not actually much difference in what we carry, most of our core items are basically the same. The main differences come in how the shared gear items are divided between us. Barry carries a larger section of the tent than me, also the first aid & repair kit, camera and electronics bag. I carry the cookset and stove, wash stuff, water purification, guidebook(s) and smartphone. To help with pack organisation and to keep things dry, we use colour-coded waterproof stuff sacks and ziploc food bags. Our clothes bags are blue, food bags yellow/green, electrics are red etc.
To make this review logical our gear can be broken down into ‘sub-systems’ which are easier to deal with as follows: ‘Sleeping’, ‘Carrying’, ‘Cooking’, ‘Clothing’, ‘Electronics’, ‘Hygiene & First Aid’ and ‘Safety/Repair’. The following shows these in more detail with some comments on our favourite bits of gear and any changes we have made this year.
Sleeping: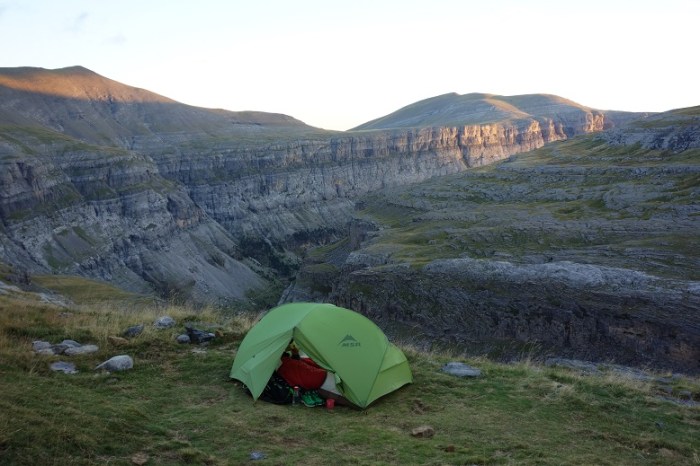
MSR Hubba Hubba HP, our home on the trail.
The Hubba Hubba is a classic backpakcing tent and much reviewed elsewhere. At 1.7kg (just 825g each when shared) it gives a lot of tent for the weight. Internally the Hubba Hubba offers one of the best floor areas of tents in its class, and the porches on either side means that our rucksacks can be stowed next to us and out of the rain. The side porches also mean we don’t have to climb over one another to get out. Inside it is well ventilated and roomy, with plenty of headspace for sitting. Although this is the ‘high perfomance’ (HP) model, the Hubba’s only downside for us is that is does not perform well in strong winds. The absence of guy attachments (except at the end-vents) means that it gets buffeted badly, twisting and flattening in very strong gusts. Overall though we find it a superb tent for our needs.

Rab Alpine 600 sleeping bag, Thermarest NeoAir Xlite (regular) and Mammut inflatable pillow- a bit of luxury after a long day.
We both use Rab Alpine 600 down bags with pertex shell, these bags are ok, but not great. At 1.1kg they are light and will comfortably take us down to about -1 degrees, although I sleep colder than Barry so for me the figure is more like 2 degrees. Temperature regulation seems to be a problem with these bags, they are either not warm enough or too warm (!) The issue seems to be too much fill at the feet, which get hot, and not enough around the upper body where we loose a lot of heat at night. They are about 4 years old and still have reasonable loft, but we would like to replace them at some point for even lighter, less bulky models with better fill and themal regulation.
The Thermarest NeoAir has become a legendary back-packing air matress. At 350g they are superlight but extremely comfortable- a combination hard to achieve. After hearing so much praise for them, we are now the proud owners of NeoAirs and will both appreciate the sheer luxury of these mats after long trail days. My old foam Thermasrest Z-lite has been cut into sections and we’ll take a section each as a sit-pad.
Carrying:
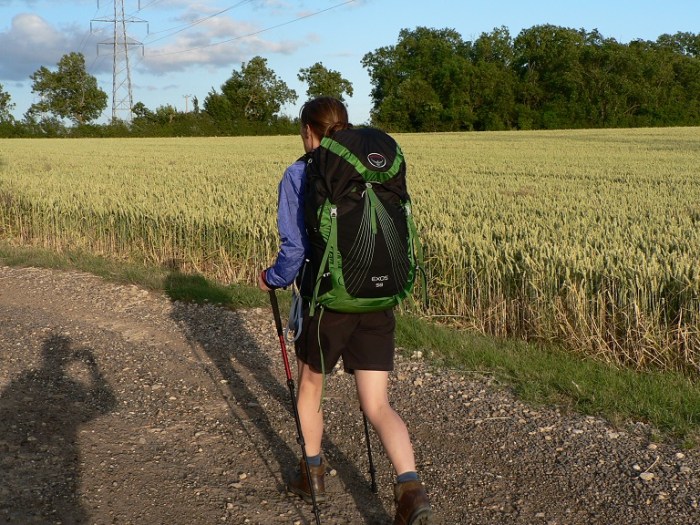
Testing the Osprey Exos 58 pre-GR11. This proved to be our star bit of kit, packing lightweight, quality and comfort into one epic rucksack.
Our swap to the Osprey Exos 58L rucksack was our biggest single step towards lighter hiking. At a just 1.09kg, these bags give good support, comfort and funtionality. On the GR11 they coped with loads of up to 18kg without a problem, the padded shoulder staps and padded hip belt gave great comfort and hold. The support provided by the frame and hip belt, along with the tension straps behind the shoulders, means that we can adjust the load distribution and fit to suit us. The hip belt and shoulder straps are also padded mesh which helps reduce sweating, and the mesh airflow system at the back keeps the back well- ventilated.
Internally we find the 58L volume to meet our needs perfectly, and the external mesh pockets are roomy and ‘stretchable’ enough to accomodate water bottles and other bits of gear we need to grab quickly. The only downside we can see is that, being of lighter construction than standard bags, the Exos has to be treated more carefully. The the mesh pockets on the sides seem rather vulnerable to snagging on thorns etc. Overall though, the Exos is truely a pleasure to wear and is a great rucksack.
Cooking:

From left clockwise: aluminum windshield, MSR Pocket Rocket stove, Edelrid cartridge adapter and gas canister (below it), lighter, penknife, Alpkit titanium MytiMug 650ml with lid, 1 bowl and 2 titanium sporks, 2 nalgene bottles (one has olive oil in), small scrim and 6″ square of tea-towel, MSR 1.3L quicksolo cookpot with strainer lid (sits in a pot cozy made from solar windshield reflector).
No big changes to our cook-set from 2015, it was a simple and reliable set-up, limited only by the availability of gas…so careful planning needed. The stove is a screw-thread connection which is less common in mainland Europe than the ‘easy-clic’ type gas canister. To increase our chances of finding a canister that would fit in Europe we bought an Edelrid cartridge adaptor. With this, the stove can connect to both screwthread and ‘easy-clic’ canisters. This little gem was a lifesaver on the GR11. One large gas canister will last us about 3.5 weeks with careful use. The pot-cosy was also great in helping to save gas, allowing boiling pasta etc to go on cooking when taken off the stove.
The only change is that we are replacing our kettle and plastic cups with a titanium Alpkit Mytimug 650ml. The titanium mug can be put directly on the stove and acts as kettle and cup, thus saving weight and volume. One 650ml mug is big enough for both of us to share from.

Downsizing- The Alpkit titanium mug (left) weighs almost nothing and combines into one what we used two mugs and a kettle to do.
Water treatment:
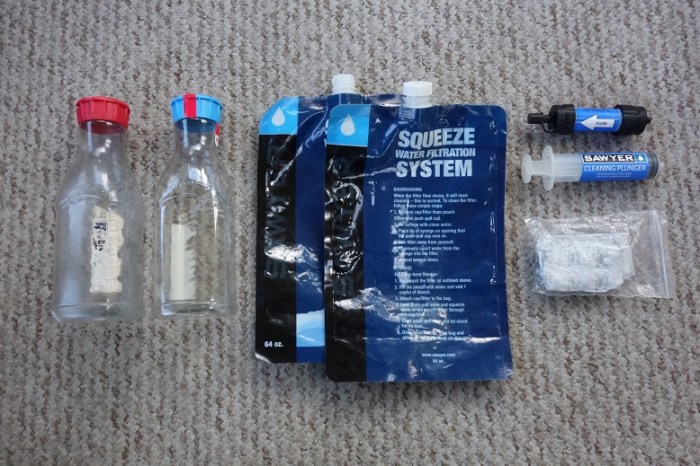
From left: 2 x 900ml ‘Innocent smoothie’ plastic bottles, 2 x 2l Sawyer water pouches, (top right), Sawyer Mini water filter, cleaning sysringe, pack of 60 chlorine dioxide tablets.
We’ll each carry 2x 900ml bottles, and one 2l pouch each, giving a total water carrying capacity of nearly 4L each and 8L total between us. We will rarely need this, but it’s good to have the option if there is a big water ‘gap’ or we need to dry camp (i.e. away from from a water supply). The Sawyer mini filter works and is simple and field-cleanable (by backflushing with the syringe) but the flow-rate on the ‘mini’ model is SO SLOW. It takes about 15min to filter 1L. I am thinking seriously about upgrading to the Sawyer Squeeze, a larger diameter model with better flow rate.
As we will be walking in lower environments on the GR1, where water sources might be more polluted, we are taking a good supply of chlorine dioxide tablets for situations where we want greater peace of mind. Chlorine dioxide has much less chlorine taste that basic chlorine tablets. Where possible we’ll always try to fill up from taps/village fuentes. Last year we each took an Osprey hydration bladder, but these were a bit of a pain, and we are reverting to bottles for simplicty and weight saving. The Innocent smoothie bottles are very sturdy and have a wide neck (for gulping water quickly!).
Clothing:
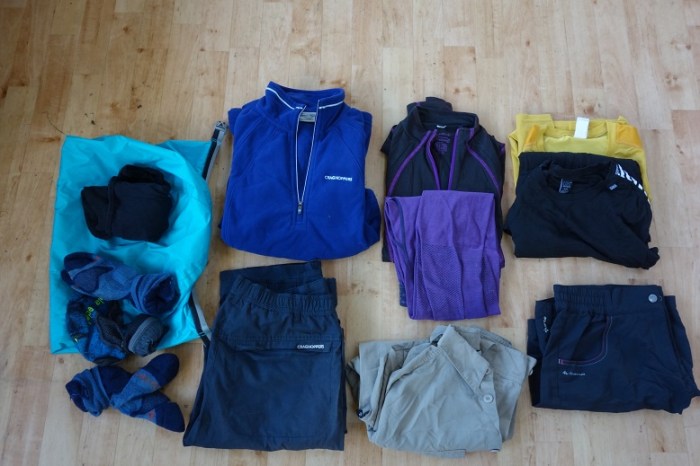
Clothing from top left clockwise: 3 pairs Bridgedale socks & underwear, Craghoppers pull-on microfleece, merino wool baselayer and merino leggings, 2 x lightweight trekking t-shirts, 1 x lightweight shorts, 1 x long sleeved trek shirt, 1 x Craghoppers fast drying trousers.
No high-end branded stuff here (except the socks), just reliable, technical clothing that is light, fast-drying, wicking and keeps us warm/cool when needed. Most of this was bought pre-GR11 at Decathlon or ‘Go Outdoors’ for a good discount, the merino baselayer which I wear a lot was £3 for example! The Merino wool leggings (worn under shorts on cold mornings and in bed), are from Lidl. These items are plenty for 3 months; if we need to wash shorts we have trousers to wear, and a spare shirt, while the other is drying. The key thing when carry few clothes is to wash them regularly. Laundry facilities are limited so we tend to wash stuff in the shower with us (or in campsite laundry sinks), and hang the items on the outside of our packs to dry as we walk. Barry’s clothing is basically the same.
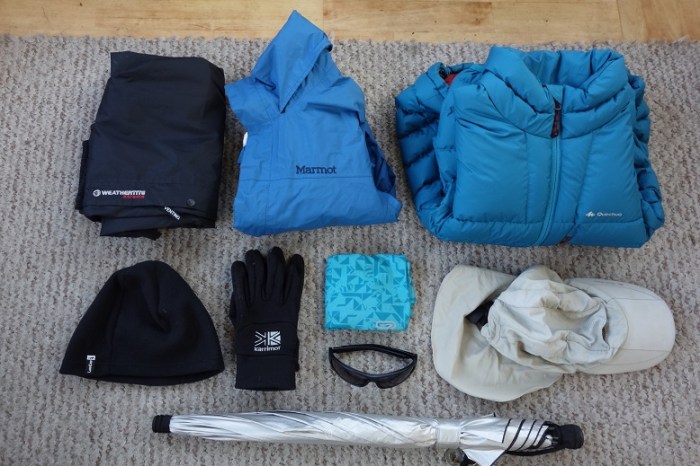
Extremities clothing/protection from top left clockwise: Karrimor rainpants, Marmot Precip rainjacket, down jacket (mine Quecha, Barry’s Montane Antifreeze), Quecha sunhat with neck protector, neck buff, sunglasses, neoprene gloves, fleece beenie, EuroShirm Lliteflex solar trekking umbrella.
Our gear for bad weather or weather protection is also mostly unchanged, the key addition are waterproof trousers. We have added them for extra peace of mind, especially as we are starting the GR1 in early season and may encouter rain and cold conditions. If we find we are barely using them we can post them home. The only other change for me is an upgrade to a down jacket from a Montane sythetic fill jacket. My new jacket, (made by Quecha, but so far great warmth and build-quality), saves nearly 200g weight on the synthetic jacket and packs down to half the size…oh, and it was £35 in the sales!
The silver Euroshirm Liteflex hiking umbrella is a useful bit of kit and superlight. As a solar umbrella it reduces the temperature beneath it by several degrees, ideal for hot Spanish days with no shade. When it rains, it also works as an actual rain umbrella, and on several occasions on the GR11 it really helped us escape a soaking in heavy downpours. The performance of our Marmot Precip jackets in heavy rain is questionable, so the umbrella gives extra confidence. We’ll be re-proofing the Marmot jackets with Nik-wax before we leave as an added line of defence.
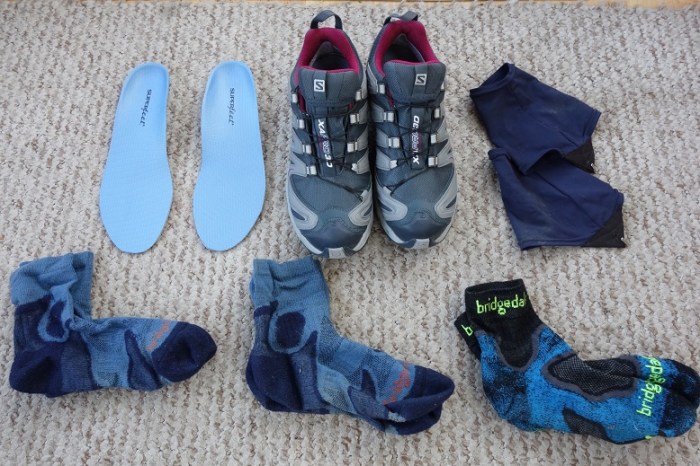
Footwear: Superfeet insoles, Salomon XA 3D Pro’s GTX, ‘Dirty Girl’ gaiters, 2x Bridgedale Trailhead socks, 1 x Bridgedale Coolfusion trail socks.
This footwear combination was a perfect match for us on the GR11, over 400 miles on the rockiest mountain trails and we did not suffer a blister between us. We are both trail shoe converts, loving the lightness, freedom and flexiblity that they offer. We swapped to the Salomon trail shoes during the GR11 and didn’t look back. The tough construction, especially toe protection was essential for the gnarly trails where our feet were grinding and twisting between rocks. The Salomons also felt great on the flat, and the easy ‘pull-cord’ lacing system is a bonus, allowing us to adjust the tension without re-lacing.
After getting our feet checked out we both use Superfeet insoles to help with hold and support, and pair these with Bridgedale Trailhead socks (I use the blue insoles, barry uses the more supportive green). We needed socks that were tough, light and breathable, but with padding on the pressure points. The Bridgedales were superb, and worth every penny. It is testament to their quality that we are using the same pairs on the GR1 as took us on the whole GR11.
Finally, to prevent grit and sand getting into our shoes and causing irritation/sore spots, we used superlight ‘Dirty Girl’ ankle gaitors. The good news is you don’t have to be a girl…or even particularly dirty to wear them 🙂 Seriously though, these are very popular among distance hikers and I found them indispensible. Barry has since got a pair too. We purchased them online in the UK from the Ultramarathon Running Store.
Electronics:

From left: Sony RX100 digital camera with double battery charger (+ 2 extra batteries) and USB wall charger. SanDisk Jazz Clip Mp3 player & headphones. Zendure 10,000 mAh external battery pack with USB wall charger, Motorola Moto G smartphone with wall charger. 2 x Energizer head-torches. All wall chargers accompanied by UK-European adapter plugs.
One of the biggest headaches is our electronics set-up (which sometimes we’d rather do without), and picking the right devices to fulfill our needs. This year a major change is our use of a Smartphone with downloaded maps and a GPS app for navigation. We read lots of reviews about budget phones and settled on the sturdy and very capable Motorolo Moto G. This 5″ screen model combines our navigation, internet-surfing and phone call functions in one. Crucially it will allow us to surf the net independent of wi-fi connections which is vital for booking ahead, checking weather and blogging of course 🙂 To avoid roaming charges we plan to load-it with a pre-paid Spanish data sim. A 5″ screen is probably the minimum viable size I need to try and blog from the trail, even so, it will be fiddly!
As we are walking in the opposite direction to the guidebook, the GPS app is our navigation lifeline, so we need the phone to have plenty of charge for up to a week. Assuming one charge will last about 2 days max, we will need more power, so after lots of research we selected a 10,000 mAh Zendure external battery pack. This device charges from the mains and, allowing for some inefficiencies, will give us 3+ full phone charges. Thus, with a fully charged phone and battery pack, we have enough power with us to navigate with the app for 8 days. We will stay somewhere every 8 days or so to charge everything up (and recharge ourselves…).
Finally, our RX100 Sony compact camera is a star, and has done a great job providing high quality pics for this blog among other things. It doesn’t have a viewfinder but in other respects is excellent. One battery can be charged inside the camera, but Barry bought 2 futher batteries and a small USB charger so we have enough picture power for a week also.
Hygeine/First Aid:
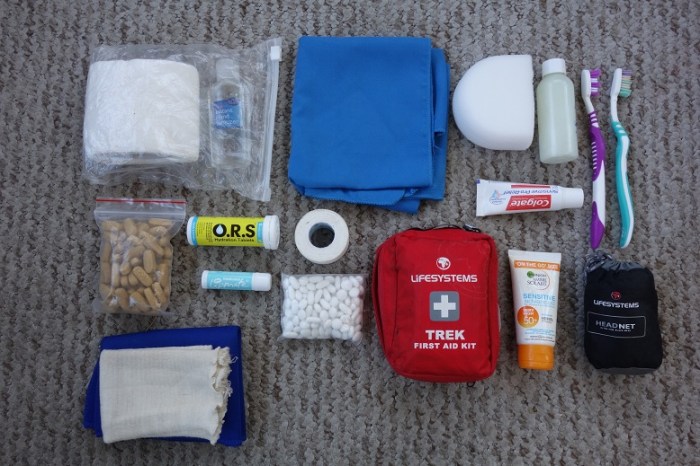
From top left clockwise: Loo roll and hand sanitiser (kept togther in a ziploc, small section of microfibre towl, sponge, small bottle soap, toochbrushes and small tube of paste, bug headnet, SPF50+ sunscreen, small first aid kit (personalised), roll zinc oxide tape, pack of Ibuprofen, ORS rehydration tablets, medicated lip balm, Quest multivitamins, 2 x knee supports.
In addition to the items shown above, we personalised our first aid kit and it now contains: Selection of plasters (including blister plasters), a medium dressing, 2x antiseptic wipes, mini sachet of burns gel, 3 safety pins and immodium. The roll of zinc oxide tape is great for strapping toes or other sore spots if rubbing occurs. The multivitamins from Quest are high dosage, slow release, and are important as a top-up when our diet suffers from a lack of fresh fruit and veg. The small bottle of soap is used for washing ourselves, our clothes and the dishes!
Repair/Misc:

From top left clockwise: Spare velcro attachement for gaitors, small roll duct tape, tenacious tape, 5m nylon cord, ziploc, small tub vaseline, 3 x milton sterilisation tablets, earplugs, needle and thread, 2 x spare buttons, tube of seamgrip.
There is no end to the different scenarios that might require an emergency repair, and it is easy to take too much stuff to cover all this. Everyone has their own pet items to bring, what we have chosen allows us to make repairs to our kit (or even ourselves), until we can reach help or buy replacements. This selection weighs nearly nothing but could prove vital. The vaseline is particualrly multi-purpose, and is great to put between toes to reduce friction and for chafing (rather than adding more specific creams and lotions to do the same job).
—————-
So, that’s our gear set-up for the GR1, I hope it is an interesting insight for anyone wondering how we’ll walk for 3 months with all we need on our backs. Our arrangement is not exactly a cutting edge one, a look at the many ‘gear reviews’ on other blogs etc is enough to show how much more streamlined/ lightweight it is possible to go. It is easy to get caught up with lots of ‘shiny’ new gear, but we have tried to strike a balance that works for us, and to not replace anything unless there is a significant benefit in doing so. Long-distance hiking and camping helps us redefine what is essential. Our gear, although a pleasure to research and carefully chosen, is only ever a means to an end. For Barry and I, it is nearly always true that the less stuff we have around us and the lighter we travel, the happier we are.
“Yet only walking manages to free us from our illusions about the essential” – Frederic Gros (A philosophy of walking).


Hi great post , we are doing the GR5 this summer , starting in August so have been researching ….. A lot …. Thanks for the tip on the gas converter as we were not sure on resupply ,so this will help , we were thinking of the alpkit mugs you have got but still thinking , will be intreasted to hear what you think of them .
Well happy and safe travels , will look forward to your blog posts 🙂
LikeLike
Hello, and thanks for the message. Great to hear you’re doing the GR5 this year. Other than getting the guidebook I have not had much time to think or plan this yet, too wrapped up with the GR1 stuff. Yes, the cartridge adaptor is really useful, I only found out about it from reading a gear list buried in someone else’s blog! Not tried the Alpkit mug yet, although I just made a mini cup cozy for it to insulate the contents and our hands when we hold it….some pics on our next post shortly. First impressions are good though, superlight, good build quality and nicely finished. We’ll review it as soon as we’ve used it properly. Thanks for reading the blog, and best of luck on your GR5 hike, it looks to be a fabulous route.
Rebecca
LikeLike
Hi – hope the hike’s going well! I’m trying to decide between a 650ml pot and my 900ml for solo use, and so I too would be really interested to know about how you get on with the Alpkit pot. Is this your only cooking pot for two people? How are you cooking – rehydrating in freezer bags?
Great blog by the way – I’d not heard of the GR1 before.
Pete
LikeLike
Hi Pete,
It’s tricky to say what would be best for solo use. We use the 650ml solely for making tea (and when full, this volume is enough for both of us). We use a separate 1.3L MSR quick solo pot for our meals, which is the perfect size to cater for 2. We wanted a separate, dedicated mug for tea as we can’t always clean our cook-pot out that well if we are dry-camping. The 650ml mug is great as it acts as a kettle and cup in one. We generally either make pasta in the MSR pot (just bringing to the boil) and then put in a pot-cozy to finish off, or boil some water in the mug and pour onto couscous in the MSR pot and mix with herbs, tuna etc. Have not used the boil in bag, or re-hydration method. I would say that a 650ml mug might be a little small for dinners such as pasta (maybe OK for re-hydrating though…), it is also a little small to put a stove/spork/windshield in if you want to keep everything neat and tidy. On the other hand 900ml might be too big for one person….hmmm, is there a 750ml option from Alpkit 🙂 Overall though we are very pleased with the Alpkit mug, it does exactly what we wanted, is sturdy but super light, and shows no ill effects from being set directly on the stove.
Thanks for your comment on the blog. Yes, I think hardly anyone has heard of the GR1…..we’ve met barely any other hikers on the whole route and the locals don’t seem aware of its existence either! There is a new book by John Hayes (published by Cicerone) that might go some way to remedy this over time, it certainly has some beautiful sections of walking in Spain’s forgotten places.
Rebecca
LikeLike
Thanks Rebecca – pretty unobservant of me to miss that 1.3L pot, duh! You’re right about the 650 size – too small for actually cooking a meal in – one has to pour the boiling water into a bag/bowl to rehydrate food. Good if really needing to cut weight but I think for a very small weight penalty the 900ml is nicer for cooking. I don’t think Alpkit do a 750ml anymore, but a number of companies do this kind of size, such as Toaks. As you say, that might be a good compromise for solo use.
You two have piqued my interest in the GR1, I’ll be following your blog with interest. How long do you think it’ll take?
Pete
LikeLike
Hi Pete, we based our GR1 + Camino Primitivo time on an average of 20km a day plus one rest day a week. Given that we exceed this average KM most days, we expect to complete in about 2.5 months. We don’t count KM too much though as we like to stop and watch the birds and generally absorb our surroundings. I’ll be doing a summary of our thoughts on the GR1 once we have completed, there are of course pros and cons. Happy to try and answer any queries you have on the route if you have them. Guidebook author John Hayes has a blog with lots of GR1 info called johnhayeswalks.
Cheers
Rebecca
LikeLike
Woah. Hard core shakedown. Thanks for the detailed writeup.
LikeLike